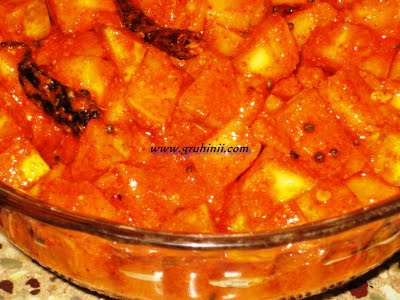
AVAKAYA
Ingredients:
* Cut and cleaned
Mango Pieces – 2 1/2Kgs
* Mustard Powder
– 560gms
* Salt – 675gms
* Red Chili
Powder – 375gms
* Husked Gingely
Oil – 600gms
* Chick Peas
(Kabuli Chana) – 150gms
* Fenugreek Seeds
– 30gms
Preparations:
Selection of
Mangoes:
Select mature,
firm, big, sour and even sized mangoes. The pickle tastes better when mangoes
are fully mature and sour. Choose only the tree plucked mangoes. Mangoes which
have fallen to ground would have internal damages which increase the chances of
spoiling the pickle
Cleaning of
mangoes and making pieces:
Observe the
sticky liquid (SONA IN TELUGU) flowing from the mango which has to be cleaned.
Fill water in a bucket. Remove the stems (Muchhelu in Telugu) attached to the mangoes
as shown in the movie. Observe the sticky liquid (SONA) coming out. Drop the
mango in the bucket. Like this remove the stems of each mango and drop it in
the bucket. Let the mangoes soak in the water for half an hour. Then wash the
mango thoroughly by rubbing between the palms. Washing this way removes the
sticky liquid from the mangoes. Take them into a tub or a big bowl. Take a
clean and dry cloth and wipe each mango thoroughly. Spread the wiped mangoes on
a clean cloth. Like this wipe all mangoes and dry them in shade for 10 minutes.
Now we need to cut the mangoes into medium sized pieces. As you see in the
movie clip the instrument used to cut the mangoes has a firm handle (for firm
grip) on a butcher’s knife and a firm base both joined at one end. Cut the
mangoes into even sized pieces. This you may attempt at home carefully or get
it done in the market from professionals. Each piece should have the hard
portion of the seed (Tenka in Telugu) attached to it. Now we need to remove the
inner portion of the seed (JEEDI IN TELUGU) which has been chopped along with
the pieces. You would notice a thin layer (Pora in Telugu) is attached to the
seed (TENKA) which is to be removed. Carefully remove the layer attached to the
TENKA — if it is difficult to remove this layer with fingers, scrape it with
the back of a spoon or a knife. Like this remove all JEEDIS and also the thin
layers (Poralu) attached to the pieces.
Measure the cut
mango pieces required for preparing the Avakaya using a weighing machine. Wash,
clean and dry the bottles or jars (in advance atleast 24 hours) in which the
pickle is going to be put and keep them ready.
Preparing mustard
powder:
In olden days the
mustard seeds were put in hot sun for two to three days and were pound in mortar
and pestal soon after bringing them from the sun.
In modern days
due to paucity of open terraces and fast life we also need to change. Take some
mustard seeds (approximately 100 grms) on to a paper plate. Place this paper
plate in a microwave oven and dry roast the mustard seeds on high power for 35
to 40 seconds. These seeds are to be removed from the oven just before the
first mustard seed would crackle. Keep a watch on the Oven and remove the
mustard seeds earlier than 40 seconds if required. Take these roasted mustard
seeds in a bowl and allow them to cool till warm to touch. Remember they should
not become cold. They should be warm enough, as though they have been put in
sun and brought home just now. Don’t be tempted to roast them on an electric or
gas stove. The heat would be more and uneven roasting takes place.
Take a clean and
dry mixie jar and add some roasted mustard seeds. Grind them to a powder. In
between open the mixer and mix once with a spoon, before grinding again. As
mustard seeds are crushed, oil oozes, and the powder sticks to the mixie jar
(more to its base). So loosen the crushed mustards with a spoon and powder
them. The powder will be slightly coarse. It would never become fine powder due
to its cover. The more you attempt to make it a fine powder, more oil oozes out
and it becomes sticky. You are the best judge to decide the optimum grinding.
Do not sieve the powder. Like this, powder all the mustard seeds and measure
the required amount of mustard powder using a weighing machine.
Similarly weigh
salt, red chili powder, chick peas and fenugreek seeds and keep them ready for
pickling.
Method:
Take a flat and
deep bowl and add mustard powder, salt and red chili powder. Mix all the dry
ingredients well. Now the Masala for the Avakaya is ready. Take a clean and dry
jar or bottle and keep it nearby. Take a shallow wide bowl (preferably a basin)
and add around 250gms of oil to it.
Follow the steps
mentioned below:
1. Add a fistful
of Masala mix into the jar and spread it at the base.
2. Take a handful
of mango pieces into the oil in the basin and coat each piece nicely with oil.
3. Transfer the
oil coated mango pieces to the prepared Masala bowl.
4. Coat the mango
pieces gently with the Masala. As each mango piece is wet with oil, the Masala
sticks to it easily.
5. Transfer these
masala coated mango pieces to the jar and spread them evenly.
6. Spread some
chick peas on the avakaya mixture in the jar.
7. Spread some
fenugreek seeds on the avakaya mixture in the jar.
Now repeat
layering once again. Like this finish off the mango pieces, chick peas and
fenugreek seeds by layering. Pour the remaining oil on top of the avakaya
mixture and cover the jar. Do not cover the jar tightly. Keep this jar aside at
a dry place for 48 hours. The sour mangoes when mixed with salt in the avakaya
masala mixture, oozes moisture. This process will take 48 hours. After 48 hours
the pickle will be wet as water oozes from the mangoes. We need to remix the
pickle. In the process the mixture becomes more compact and you would observe
that the volume has decreased.
For proper and
even mixing we would be using our hands. Therefore wash, clean & wipe your
hands till dry. Take a broad and deep vessel which is totally dry. Transfer the
pickle from the jars into this broad vessel. Mix the pickle well. If the pickle
is too dry add some oil and mix well. If it is sufficiently wet do not add the
oil at this stage. Transfer the pickle once again to the jars. Earlier we have
used 250gms of oil. Now add the remaining oil (350gms) to the jars. See that
the pickle is having a thin layer of oil above it. Clean wipe the edges of the
jar with a clean and dry paper napkin. Close the lid of the jars and store. For
daily use, take a small quantity of pickle into a clean and dry jar. Avoid
using the main pickle jar for daily use.
Measurements of
Avakaya for Lesser or More quantity:
Presuming one raw
mango weighs 250gms, we get approximately 215gms of mango cut and cleaned
pieces and 35gms of JEEDI (Seed). It is advisable to base all our calculations
on the weight of the mango pieces.
For 215gms of
cleaned and cut mango pieces, (i.e., for one mango) use:
* Salt – 55gms
* Mustard Powder
– 45gms
* Red Chili
Powder – 30gms
* Oil – 50gms
* Chick peas –
Few (approx. – 1 1/2tbsps)
* Fenugreek Seeds
– Few (approx. – 1tsp)
Learn More About
Mangoes And Salt In Pickling:
Take firm and big
mangoes. It is necessary that the mangoes are raw and creamish in color when
cut. The mangoes should taste sour. The taste of this pickle is proportional to
the sourness of the mangoes. When the sour mango pieces come in contact with
salt in the avakaya mixture they ooze out water. That water helps in moisting
the Masala in the pickle. However, when water oozes out there are chances of it
spoiling the pickle. So the salt we add saturates the water and also acts as
the balancing ingredient to the sourness of mango. It works as a preservative
for the pickle. If the sourness is too high you may need to add extra 5 – 10
grams of salt for 215 gms of mango pieces. If they are not that sour you may
reduce the quantity by 5 gms. In any case ensure that the salt content is not
less than 50 gms for 215 gms of cut mango pieces. Check, preferably after 96
hours before deciding to add more salt.
The salt which I
have used is table salt. Nowadays table salt is available in various variations
and the manufacturers are adding additional chemicals to make it free flowing.
Similarly instead of Sodium salts, Potassium salts are also marketed. Unlike in
the past, the saltness of each salt is differing. The base standard is always
sea-salt which has almost become extinct in the market. For 215gms of Cut and
cleaned mango pieces, the base sea salt requirement is 50gms only. In my video,
I have shown the table salt which I have used. My observation in the kitchen
is, Potassium salts are less salty compared to Sodium salts and I need to put
relatively large quantities of Potassium salts while cooking. With Pickles I
didn’t want to take a chance, for which I have used the regular Sodium table
salt with which I am comfortable with. Salt is a crucial component in pickling
and one has to be imaginative to deal with the practical problem. For the
novice, I can suggest to add 50gms of salt and progressively increase it,
depending upon the taste and smell coming out of the pickle.
Pickling is a job
where all family members are supposed to be involved. The couple goes to the
market to collectively choose the right mangoes (so as not to blame each other
during the later part of the year). Children would clean them and dry them,
Husband would cut the mangoes, Children would remove the Jeedi and Poralu, and
Wife would grind the Masala. Towards the end the couple would be coordinating
to mix all the ingredients and pickle the mangoes. If all (small and big) in
the family are involved, mango pickling is a fun. It tastes great because every
one’s love (key invisible ingredient) is also mixed with it which is enjoyed
throughout the year.